Showing posts with label Wow! embossing powder. Show all posts

Saturday, 17 June 2023

Sweet November stamps summer release instagram hop


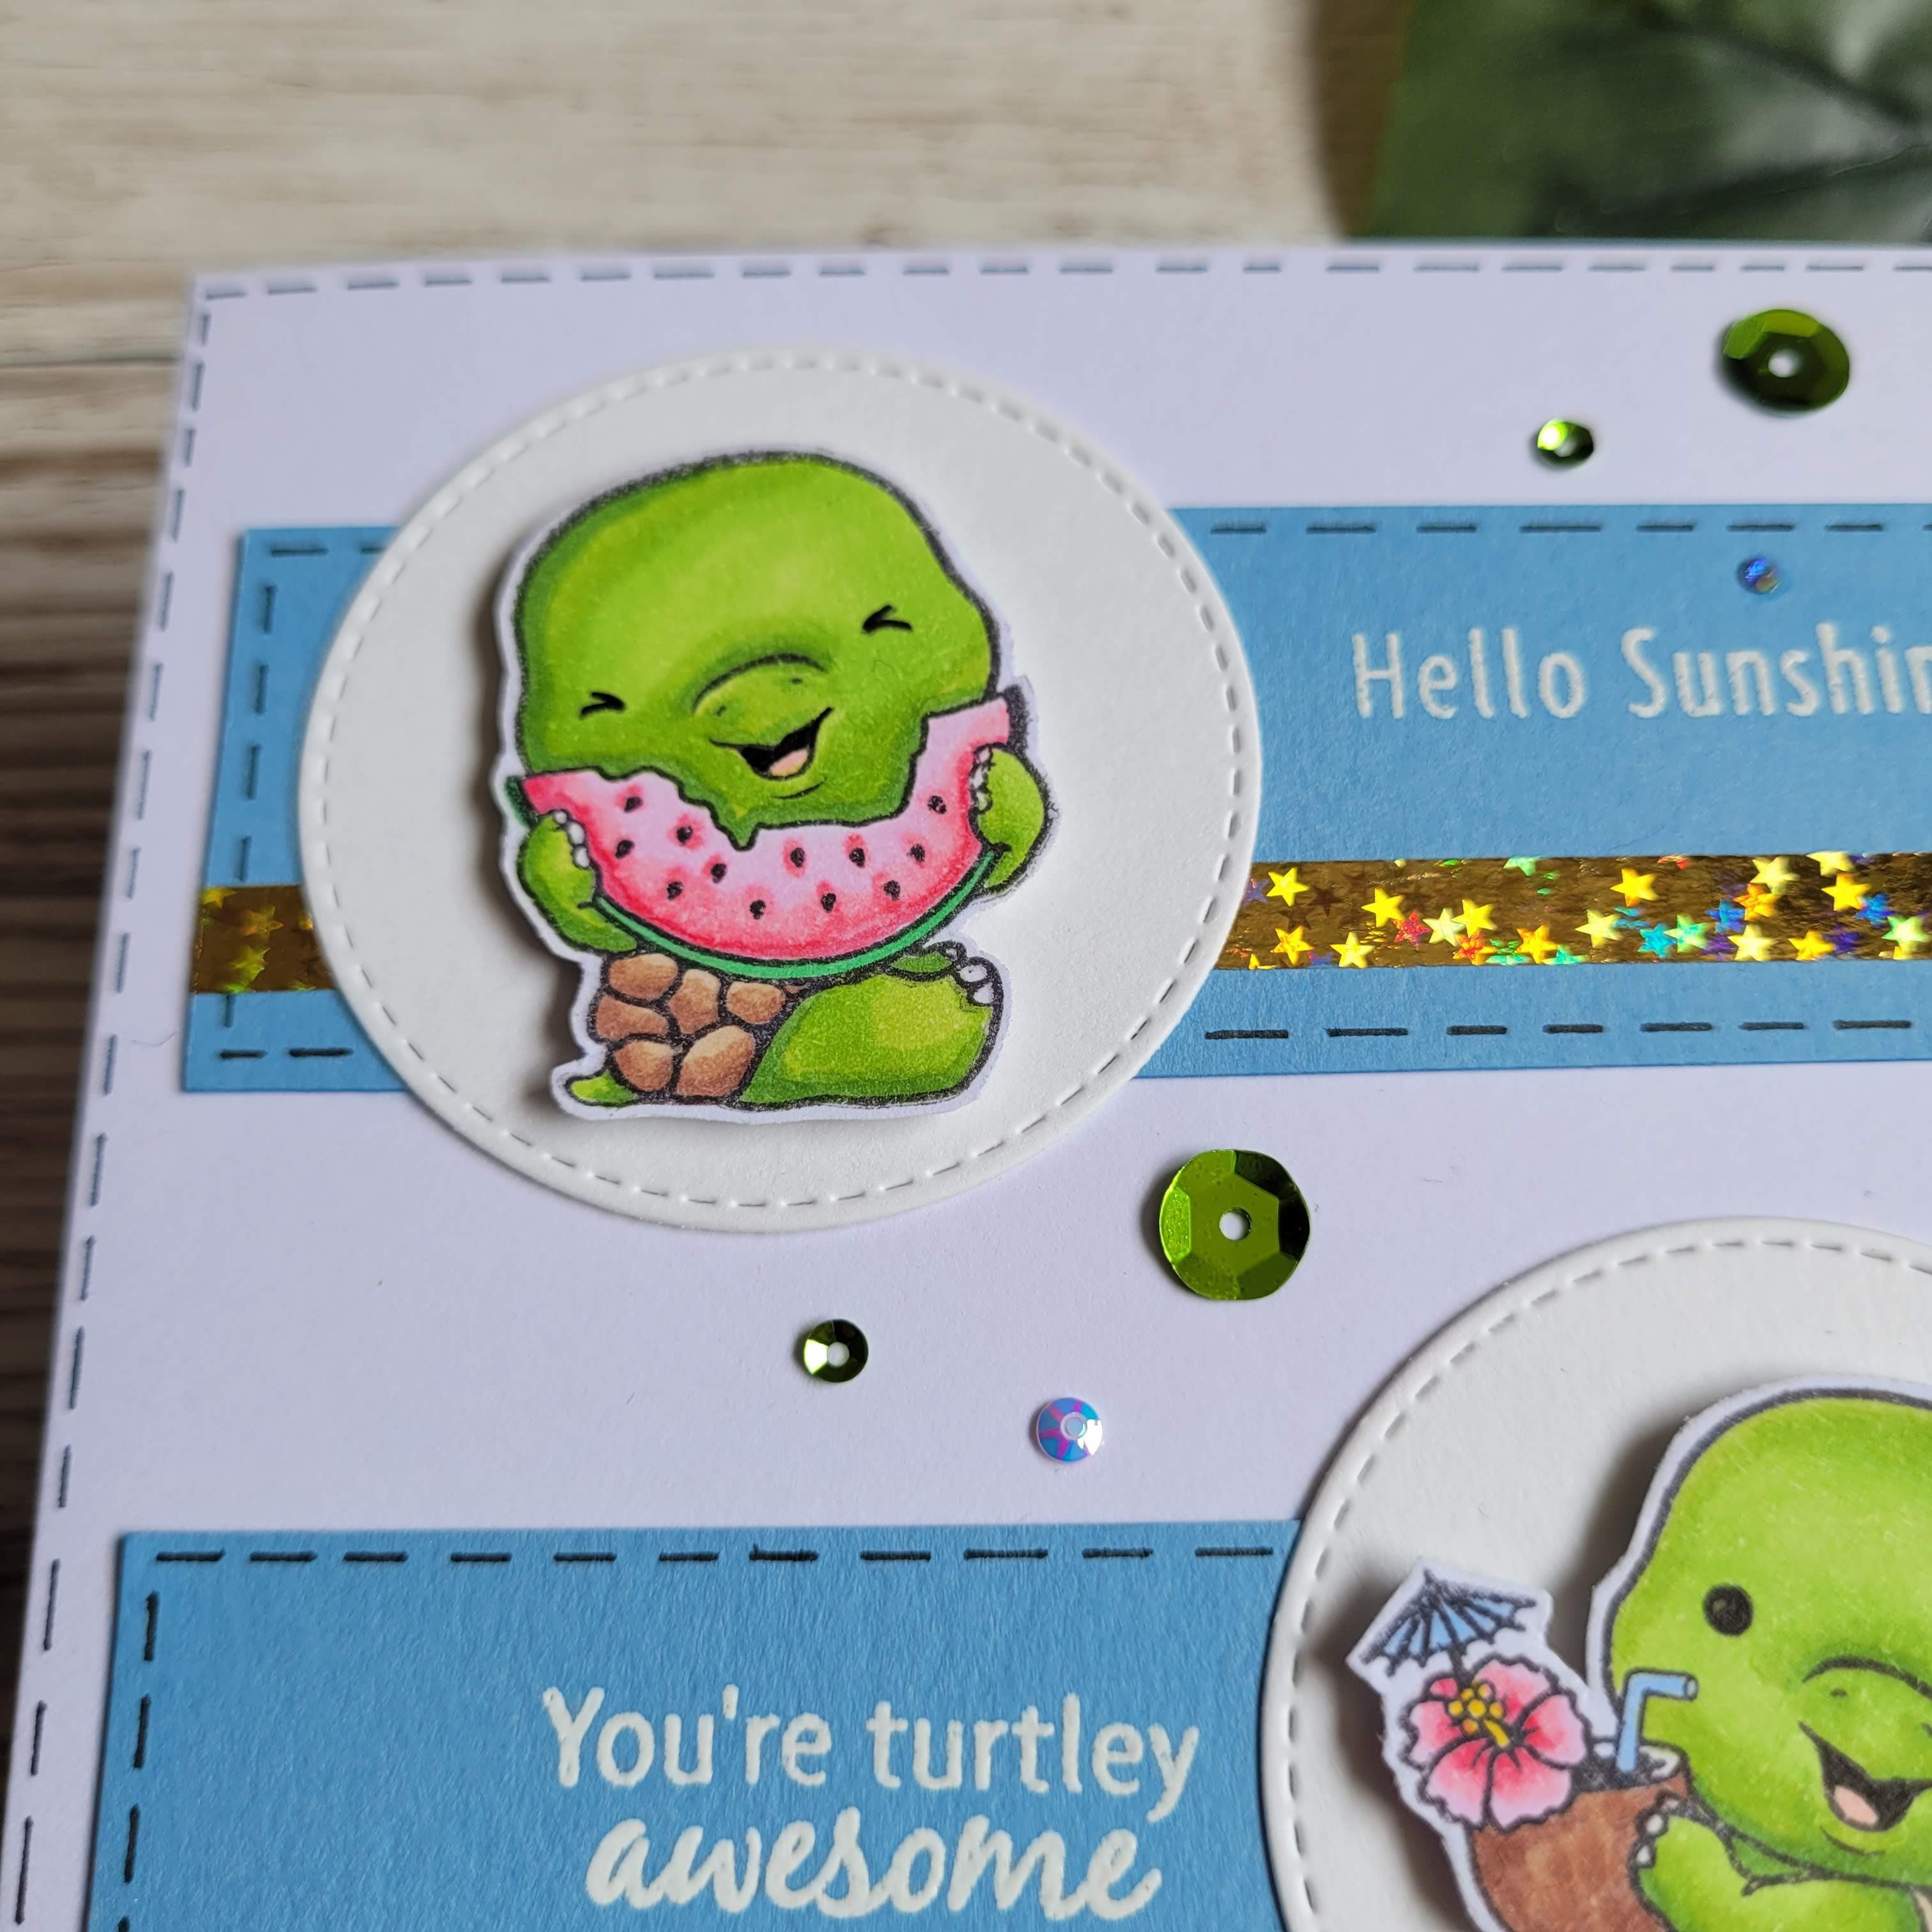
Summer is here and this year Sweet November Stamps is riding the heat wave with a fun and carefree clear stamp release. There are eight new sets that range from summer celebrations to fairytale magic as well as the new exclusive coordinating sequin mixes. To celebrate we are back hosting a sizzling summer Insta-Hop featuring both the Sweet November design team and the team from Crafty Purple Frog, our exclusive UK stockist. As always, one lucky crafter will walk away with the entire release! All you have to do is visit each designer’s account provided below, follow them, and leave a comment on their SNS post. You have Saturday, Sunday and Monday, June 17th, 18th and 19th to participate in the hop. Tuesday, we will announce the random winner on the Sweet November Instagram page.


Allison Cope @i_card_so_hard
Amanda Garrett @thelittlepinkcaboose
Amy Gould @craftypurplefrog
Amy Young @amyyoungforever
Caitlin Anthony @caitlinannaleecards
Claire Harrison @mrs_h_crafty_corner
Cline Passio @clinepassio
Danielle Dunlop @danielledunlop21
Faye Wynn-Jones @fayewynnjones
Jasmin Oliver @jasmincraftymakes
Jeannean Marshall @jeanneanmarshall
Lisa Jannaway @craftytrain1
Lucy Dyer @owlwayscrafty
Sweet November Stamps @sweetnovemberstamps


This giveaway is sponsored by Sweet November Stamps.


For my card I used the adorable Paisley stamp.
I coloured her with the following copics:
Skin: V17, E35, E13
Hair: W9, W7, W5
Dress: B18, B16, B12
Shoes, hair band and belt: RV66, RV55, RV63


For her balloons I used a few layers of Wow! Turkish nights after colouring in the balloons with a wow! embossing pen. The back ground I started by inking the background with Kitsch flamingo and a bit of picked raspberry distress oxide. Then I added some stencilling using Heffy Doodles confetti heart stencil before doing some ink splattering with Picket fence spray stain and Cocktail party distress mica stain.


If you like this little girl there are 2 chances to win her and the entire June Sweet November Stamps release by joining a hop over on Instagram CLICK HERE.
And another hop on YouTube CLICK HERE
There is a load of inspiration on the way for everything from the new release.

I am entering this card for the following challenges:
Pattie's Creations - Anything Goes


Thank you for taking the time to look at my blog.


Huge hugs


Amy xx

Thursday, 13 October 2022

I am feeling a bit batty


This is a little card but I have combined a few different stamp sets for this scene. The walls are from the Halloween room scene builder set. The window frame is from the Halloween room add-on. The bats are from both the frightful flutterbee Claudia and Bram stamp sets.
I used some white Wow! super fine embossing powder for the sentiment so it stands out against the black. I did masking to make this all one layer which always helps for the postage costs and coloured the scene with copics. I added some little stars in the night sky with a white pen.


I am entering this card for the following challenges:

Unicorn challenge - Anything spooky or cute

Heart 2 heart - create a cool background

Thank you for taking the time to look at my blog.


Huge hugs

Amy xx


Saturday, 13 August 2022

You're a treasure


These super cute little Koala's are from Create a Smile stamps and I had a lot of fun colouring these up with my spectrum noir tri-blend markers. This stamp set is called All hands on deck 


I am entering this card for the following challenges:

Crafty Animals - Anything goes with an animal
Creative Fingers - Anything Goes
Pattie's Creations - Anything Goes
A perfect time to craft - Anything Goes

Thank you for taking the time to look at my blog.


Huge hugs

Amy xx

Sunday, 24 July 2022

You're Turtley awesome!

Seriously, how adorable are these little turtles?? I am so in love with them. They are from the Kraftin' Kimmie Turtle-y awesome! stamp set. I have coloured them up with copics before adding them to the circles that I die cut using Heffy Doodle's stitched circle dies using foam pads. 


The sentiments come with the stamp set and I have heat embossed them with Wow's super fine white embossing powder. The blue strips I hand drew the stitching around them and then added the Stix2 foiled which is from the pick & mix pack. To do this I used some stix2 double sided tape to create the nice straight line. The gems and sequins are from the new Heffy Doodle Pixie Hollow Sparkles pack.  

I am entering this card for the following challenges:

 Kraftin' Kimmie - Colour it up
All sorts - Summer
Critter Crazy - Anything Goes with a critter
2 sisters on the blog - Anything Goes

Thank you for taking the time to look at my blog.


Huge hugs

Amy xx

Sunday, 3 July 2022

Hello beautiful


This card has been made using some of the great techniques shown in the Stunningly simple watercolour techniques class from Altenew by the lovely Lydia Evans. I love the look of watercolours but hardly ever use them and in the past have not been that confident when using them so I went for this class to improve my skills and confidence. For this card I used the Altenew water colours from the watercolor essentials set. In the set you get 12 colours and a watercolour brush so you really do have everything you need other than paper and water.

There are just so many little tips and great techniques in this class. I have used the faux smooshing technique for my background. I love the freedom and fluidity this technique allows.


What you can't see very well in this picture is that I also added some Atlantis burst shimmer powder once I had added two different colours of water colour so this also sparkles beautifully.
Next I decided which stamp set I wanted to use and I went for the Wallpaper Art stamp set. I stamped the images of the flowers I wanted on to watercolour card in wow! embossing ink and then used Wow! gold embossing powder to give me the raised shiny lines. I thought about doing this with black embossing powder but wanted to try something a bit different so went for the gold and I like the contrast and shine it brings to the card.


I took my time water colouring my flower filling a petal at a time with water and dropping in two shades of red water colour making sure it was darker at the base of the petals and waiting for each petal to dry before doing any of the petals next to the wet sections.


To finish this card off I fussy cut the flowers out so I could cut along the gold embossed outline and not have any white border around them. Then I popped them up on foam pads. 
Before I stuck everything together I stamped the Hello beautiful sentiment from the Amazing You stamp set onto the background I had made in the same gold Wow! embossing powder. I made sure my back panel was completely dry before I did this and used an anti static bag to stop the embossing powder from ending up anywhere that I didn't want it.
I put the whole back panel up on foam as well then added the flowers.


To finish the card off I added some Gold Coast nuvo drops which add a bit more sparkle and balance to the card.

I am entering this card for the following challenges:

Lil' patch of crafty friends - Anything Goes

Stamping Sensation - Summer flowers

Allsorts - Flora or fauna

Crafty Catz - Anything goes with optional twist of say it with flowers

Creative fingers - Anything Goes

Patties creation - Anything Goes

This card has been made to go towards my Altenew Educator Certification Program (AECP) level 3 I have a few more classes to go before my final assessment which will be a class. So if you would like to find out when I am am going to run my class and maybe join in with it please follow me so that you can see my future posts :)

Thank you for taking the time to look at my blog.

Huge hugs

Amy xx


Saturday, 14 May 2022

With a Twist


I can not believe this is my last class for level 2 of the Altenew Educator Certification Program (AECP) It feels like I have learned so much up to this point and I loved this class called With a twist possibly the most out of all of them so far. It is all about doing things differently or in an unexpected way. I am looking at almost my entire craft stash differently now.

For this card I used the idea of using unexpected colours and colour combinations, did not use all of the layers of the beautiful Vintage Roses layering stamp set and I used embossing powder for one of the layers I did use. 


On top of all of that I used the die cuts in a way to look like they are faux embossing across the whole card.


For the inks I used the following Altenew Crisp Dye inks:

I have also used the half tone everything stamp set (at the time of typing this that stamp set is on sale so grab yourself a bargain!) for the sentiment on this card. Again I stamped it in the same coloured ink as the roses and then did the second outline stamp in gold wow! embossing powder.
To finish it I inked up a piece of white card with fresh lemon ink to layer the sentiment on and then hand drew some borders around the edges with a fine liner


I am so pleased with the way this card turned out. I was completely outside of my comfort zone for quite a bit of it and am so happy I went with it. I love the end result.

I am going to enter this card for the following challenges:

Creative Fingers - Anything goes
Paper Babe Stamps  - Anything Goes
Make My Monday - Springtime

Thank you for taking the time to look at my blog.
Huge hugs

Amy xx

Monday, 25 April 2022

Impressive Heat Embossing


I am such a fan of heat embossing and so was really excited for this class called Impressive heat embossing. I had never used embossing powders with layered stamps and this was so much fun. I have so many ideas now for my other layering stamps :)


I used the Garden Delights stamp set and its coordinating die set for this card.  I wanted to try and get outside of my comfort zone with this class so I decided to keep it black and white and just add a highlight with the gold.


I also used an idea for another lesson in the class and used clear embossing powder to give a tone on tone effects across the back of the card. I think this give a great touch of texture and added interest.


The sentiment is embossed in gold to stand out and is from the painted greetings stamps set. I coloured a black edge around the card to frame it and you can see how the ink resist happened as I waited to colour the edges after I did the clear embossing. I like the way this adds a little extra detail when you look closely. 


I am going to enter this card for the following challenges:
Creative Fingers - Anything Goes
Patties Creations - Anything Goes

Thank you for taking the time to look at my blog.

Huge hugs

Amy xx


Sunday, 24 April 2022

Painting with inks and sprays


I am here with my next card for the Altenew AECP level 2. This is my fourth class for level 2 and I am loving getting back into the AECP again. This call is called Creative Watercolor Media class. I saw this and thought it was going to be all about watercolour paints.....I was very wrong! This is such a great class getting you to really stretch your crafty stash and see the potential of what you have. For this card I have combined some of the lessons.


I really like the graphic nature of the Wallpaper Art stamps and wanted to use the technique I had learnt from this class about painting with my Crisp dye inks to give it a bit more of a watercolour delicate feel to it. I stamped the flower onto water colour paper and then embossed it with Gold Wow! embossing powder. Then I started painting with Pink Diamond crisp dye ink adding in more shade and depth with Fuchsia crisp dye ink. I love the way this painting with inks turned out. I also gold embossed one of the leaf sprays from the same stamp set and then cut it up to give me smaller branches of leaves to spread across behind the flower. 


For the background I had so much fun. I had never thought of using the metallic shimmer sprays like water colours before. I cut a piece of water colour card stock to size then covered it in water. I took my Dusk metallic shimmer Ink spray and sprayed it on the background. I wasn't that happy with the way it looked so I added more water and brushed it spreading it like paint. Then I sprayed it again. I left that to dry before taking the spray top off and flicking the tube over the paper which gave me some even darker dots and I think a lot more depth to the back ground. I just love the way the whole background sparkles. I think I NEED more of these sprays!


I am going to enter this card for the following challenges:

Avenue 613 - Anything goes with optional twist April showers (I think the ink splattering looks like rain)
Alphabet Challenge - B is for Blooms

Thank you for taking the time to look at my blog.

Huge hugs

Amy xx


Thursday, 7 April 2022

I appreciate you


 I am back again with my card for my third class for the Altenew AECP level 2. This card is from the Color your day class. This class has made me buy a colour wheel, which I think is going to be a great addition to my creative process. I have known about the colour wheel but never thought about having one by my side to be able to just quickly refer to. I absolutely LOVE colour and am a big visual person swatching all my stash so I can see how it is going to look together before I start making. This class was so much fun and I feel like I learnt a lot.

For my card I wanted to use a stamp set which is quite new to me the Altenew Garden Delights stamp set. I have to say that this set is beautiful. It was a dream to line up and I really like the little sentiments that come with it.

I wanted to use the complimentary colours for this creation while adding in the black to make them pop. I used the 70,20,10 theory where I had red for the 70, green for the 20 and black for the 10.

For the flowers I used the following Altenew Crisp dye inks:

Pastel Sunrise, Canyon Clay and Burnt Red. They are all in the Martian Terrain ink set.

The leaves are Frayed Leaf and forest Glades which are both in the Green Fields ink set.

I used the coordinating dies to cut all my leaves and flowers out.


I hand drew the black frame in and added the black centres for the flowers with Nuvo Black Board vintage drops. For a bit more red I used the splatters in the Inky Bouquet stamp set. 

To finish this card off I cut a strip of black card and embossed the sentiment from the Garden Delights set in white super fine Wow! embossing powder.


I am entering this card for the following challenges:

Crafting Happiness - Anything Goes

Through the Craft room Door -  Anything Goes


Thank you for taking the time to visit my blog.

Huge hugs

Amy xx


Wednesday, 6 April 2022

Bleaching with water and it is beautiful!


I am back with my next card for the Altenew AECP level 2. 

For this card I took my inspiration from the Beyond Basic Backgrounds class. I have to say I have been crafting for many years now but I absolutely loved this class! There were so many tips and techniques that I could learn from and I had so much fun making and playing with the different techniques.

But my favourite was the idea of bleaching with water. Why oh why have I not done this before?? 

I just LOVE the way it stretches your stamps as well as giving this subtle but beautiful result. I am also so impressed with how well it has kept the fine detail that is in the Altenew Quaint Blooms stamp set. I was so sure it was going to bleed over the edges and give a sort of fuzzy look. For the record you can get that look if you add more water to your stamp. It gives a different but equally beautiful look.


For this card I first blended Blueprint sketch, mermaid lagoon and salvaged patina distress oxide inks all over my piece of watercolour card stock. Then using my stamping platform I lined up the Quaint blooms stamp where I wanted it and then used a sponge to apply water to the stamp. I stamped with the water about 4 times to get these images to appear this clearly. Once I had that beautiful background I did not want to cover it up too much so added the Painted Encouragement stamp set which I embossed with Gold super fine Wow! embossing powder. Before finishing it off with a few sparkly gems.

I hope you can try this technique out for yourself and I can really recommend taking the class to find out all of the other hints and techniques :D

I am entering this card for the following challenges:
Pammies inky pinkies - Anything Goes

Thank you so much for visiting my blog
Huge hugs

Amy xx


Monday, 2 August 2021

I love your heART


I am so excited to be taking part in the Heffy Doodle Fan hop 2021 over on Instagram.
There are so many incredible creations from all the people taking part so if you haven't seen them you can join the hop from the very lovely @jasmincraftymakes 


For my card I have used some of the new Heffy Doodles release. The pencil heart is a die set and I used it to cut both the pencils and the window in the front of the card. I coloured the pencils with copics as shown in the picture below.


I used the Pandtastic pandas stamps to stamp all over the front of my card blank and left them uncoloured so that the heart stands out more. The sentiment is also from this stamp set and I stamped it onto black card before embossing it with white Wow! superfine embossing powder. I couldn't resist stamping 2 of those little pandas so that they could be both on the inside and outside of the card. I had to trim one of his legs just slightly so that they lined up but I don't think you can tell :D


I hope you are having a good day and thank you so much for taking the time to look at my make :D


Thank you for taking the time to look at my blog. I would love it if you would follow me and leave me a link to your blog so I can follow you back


Huge hugs
Amy xx

Thursday, 22 July 2021

Shake it up


For the first time in ages I have had a go at a shaker card. The shakers bits are all from random things I have picked up off of e-bay over the years and decided to put together for this. I ink blended a background with Blueprint sketch, broken china and tumbled glass distress oxide ink. Next I used the Kraftin' Kimmie snowflake kisses stamp set as well as some clear sparkly embossing powder to add a bit of sparkle and texture to it. To finish it off I used some gold embossing powder and a sentiment from the Holiday wishes stamp set to make the sentiment stand out from the background. 

I used some acetate that I cut to the same size as my inked panel and added foam tape all around the edges of it. Before sticking it to the inked panel I used an anti static bag on the inside of the acetate and then put my chosen shaker bits in it. To hide the tape I die cut a the scalloped slimline frame from the Falalala die set and stuck it on the front of the window.

The adorable mouse is from the Cool critters stamp set and coloured him up with copics before attaching him to the front. 

I am entering this card for the following challenges:
Kraftin' Kimmie - Anything Goes
Sweet Stampin' - Create your own background
Gem of a challenge - Anything goes
Dare2BArtzy - Christmas in July
Dragonfly Dreams - Christmas in July
The Holly and Ivy - Anything Christmas goes
Ike's World - Christmas in July


Thank you for taking the time to look at my blog. I would love it if you would follow me and leave me a link to your blog so I can follow you back


Huge hugs
Amy xx


Friday, 2 April 2021

Swanning around


 In case you haven't seen I have started making my own stamps for Crafty Purple Frog. I am so excited to be able to bring my drawings "to life" :D So far there are two main animal stamp sets. One is this swan from the Spread your wings set and the other is a badger from The Sett stamp set. For this card I have combined some of the little extras in the badger set with the swan. I think the swan looks ready to go to the theatre in his smart out fit. For the back ground I used some distress oxide inks along with one of the stencils that is in the Top hat layering stencil set. Rather than layer them all up I just used the dot stencil and moved it around to make a pattern I was happy with. 

The sentiment is from the sentiment sett. I embossed it with white Wow! Embossing powder so it stands out well against the black card as well as adding a touch of texture. 

I don't know about you but I am so looking forward to being able to get out to events like the theatre again one day. I hope you are having a good week so far and staying safe.

 I am entering this card for the following challenges:

Crafters cafe - Anything goes
Crafts Galore encore - Anything goes
2 crafty critter crazies - Anything with a critter goes
Classic design challenge - Anything goes
Clever Dexter - Anything goes
Country View - Birds and bees
Crafty Animals - Anything with an animal goes


Thank you for taking the time to look at my blog. I would love it if you would follow me and leave me a link to your blog so I can follow you back.

Huge hugs
Amy xx

Wednesday, 24 February 2021

2 ways to add a veil to the badger from Crafty Purple Frogs "The Sett"


This is a very quick video to show 2 ways to add a veil to the badger from Crafty Purple Frogs "The Sett" It shows both masking and where you can cut the veil if you want to make it as two separate pieces that you can then add together.  
This is an example of a finished card using the cut version.


For this card I used the "Flowers & Berries" set to make a background and the "Sentiment Sett" for the congratulations sentiment which I embossed with some Wow! gold embossing powder


Thank you for looking and if you are free there will be another crafty chat session at midday today UK in the Crafty Purple Frog facebook group that you can join :D
I am entering this card for the following challenges:

2 crafty critter crazies - Anything with a critter goes
A bit more time to craft - Anything goes
A perfect time to craft - Anything goes
Crafts galore encore - Anything goes
Crafty Animals - Anything animal goes
Crafty Friends - Animals/birds

Thank you for taking the time to look at my blog. I would love it if you would follow me and leave me a link to your blog so I can follow you back.

Huge hugs
Amy xx

Wednesday, 17 February 2021

Fancy a cuppa?


This is the second sneak peek of the first ever release by Crafty Purple Frog. This adorable badger is part of a stamp set called "The Sett" a bit of a pun as badgers live in setts. There is also a sentiment set to coordinate with the bargers call "Sentiment Sett" There are more accessories with this badger so you can really go to town dressing it up and having fun :D
For my background I used some clear Wow! embossing powder to do an ink resist technique on white paper. I used beautiful blender brushes and distress ink then the tiny heart that is in the Sentiment Sett with the same colour distress ink to give it a soft tone on tone feel. I coloured the badger with spectrum noir tri blends.


The new release will all be available in the shop from Friday the 19th of Feb. I hope you are enjoying these little sneak peeks :D

I am entering this card for the following challenges:
 
The funky Junkie - Mostly neutral
Crafty Sentiments - Anything goes
Creative Moments - Anything goes

Thank you for taking the time to look at my blog. I would love it if you would follow me and leave me a link to your blog so I can follow you back.

Huge hugs
Amy xx